Clip Studio Paint How to Draw Circle
In recent years, mandalas have get quite popular. These symbols institute in Buddhism and Hinduism are known for their geometric and repetitive shapes. Nowadays, we can see them in coloring books for adults, because coloring them in helps people relax.
The main shape in cartoon a mandala is the circle, to which you can add dissimilar elements to create a complex symbol that tin can consist of as many parts and shapes as you want.
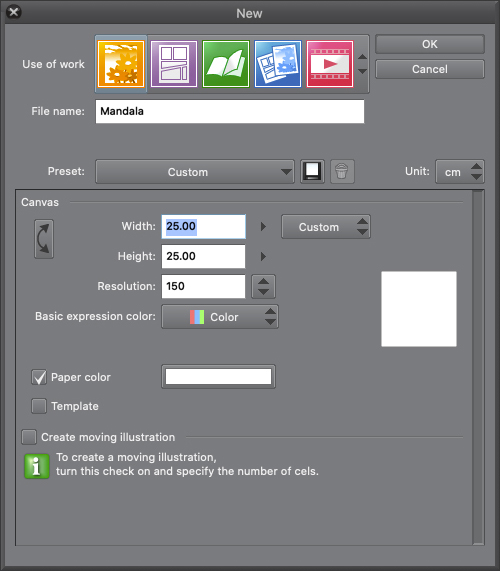
To practice this, start past creating a foursquare document. Depending on the purpose of the drawing, the resolution will be 72 dpi or 150 dpi. For this tutorial I'll use 150 dpi, just in case I desire to print it in the future.
ane. Line art
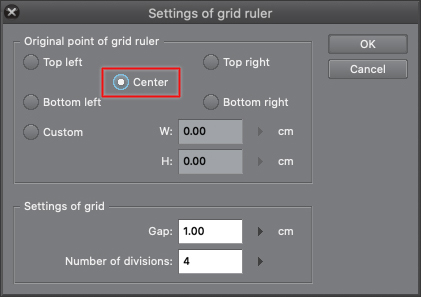
To draw the line art of the mandala, it's easiest to use Clip Studio Paint's symmetric ruler. Just beginning, let's create a new layer, so and plough on the grid by selecting the View carte du jour > Grid setting. To find the center of the page, go to View > Grid Settings and turn on the selection to center the filigree. This will mark the eye of the filigree.
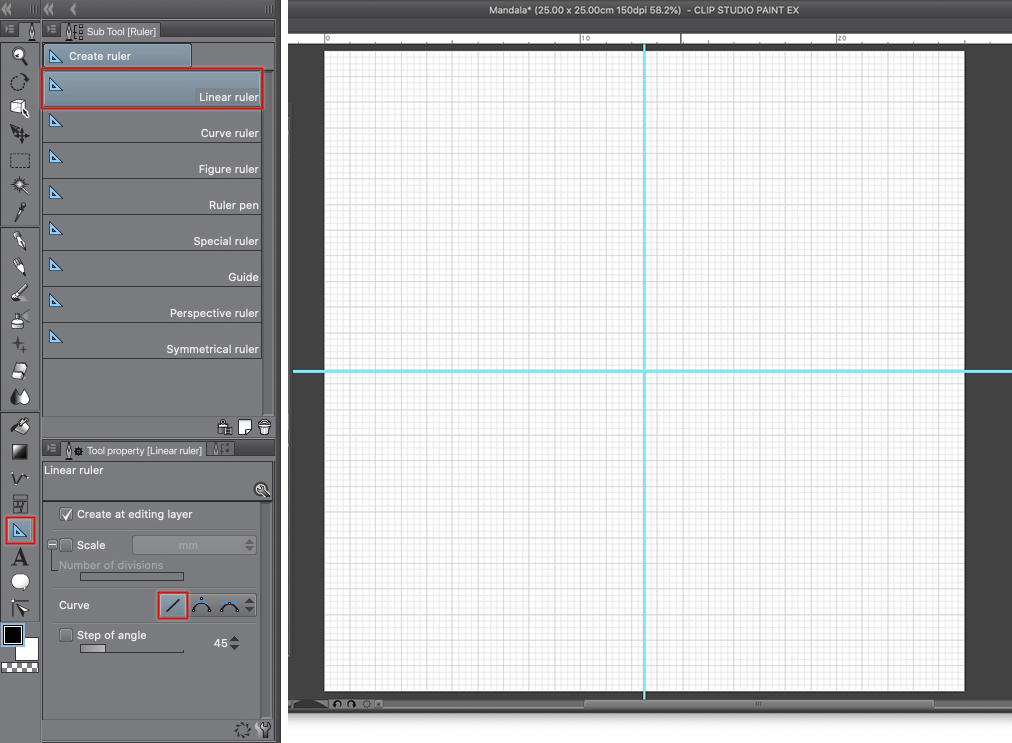
Once you have the heart, you lot can easily draw a horizontal line and a vertical line which meet in the center of the page using the Linear ruler tool, which is in the left tool palette. Select the Linear ruler equally shown in this image.
In one case you take the axis drawn, it's time to move onto using the Figure ruler to create the basis of the mandala.
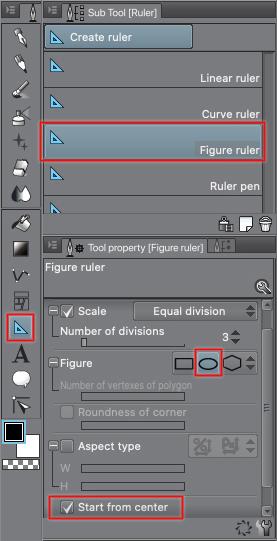
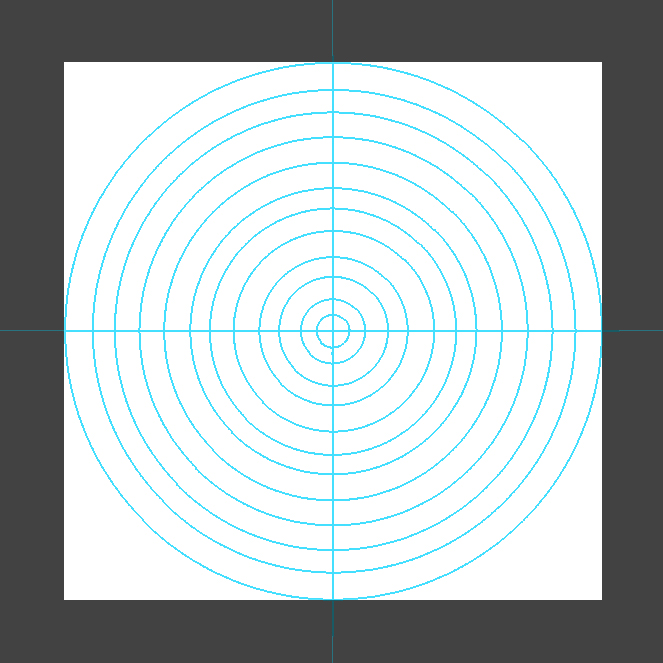
Starting from the centre, create dissimilar circles as you lot like. For this, brand sure that yous have selected the appropriate shape in the Tool Property palette, and that Start from center is on. This will make it easier to draw the concentric circles.
It is not necessary for the distance betwixt each circle to exist the aforementioned. Be as creative as you want. Before drawing the mandala, I recommend that you lot await for references and inspiration online or in books and check the usual structure of a mandala.
Once yous accept the foundations drawn, y'all can kickoff creating the different elements of the mandala, such as circles, semicircles, tears, lines, etc. This volition exist the base for the line art.
To create these lines that aren't circles, use the Curve ruler. In the Tool property, make sure the Curve is set up to Quadratic Bezier.

Behave in listen that it is just necessary to create the ruler pattern in a quarter of the image, since the Symmetrical ruler will generate the rest of the image later based on what you draw in that quarter.
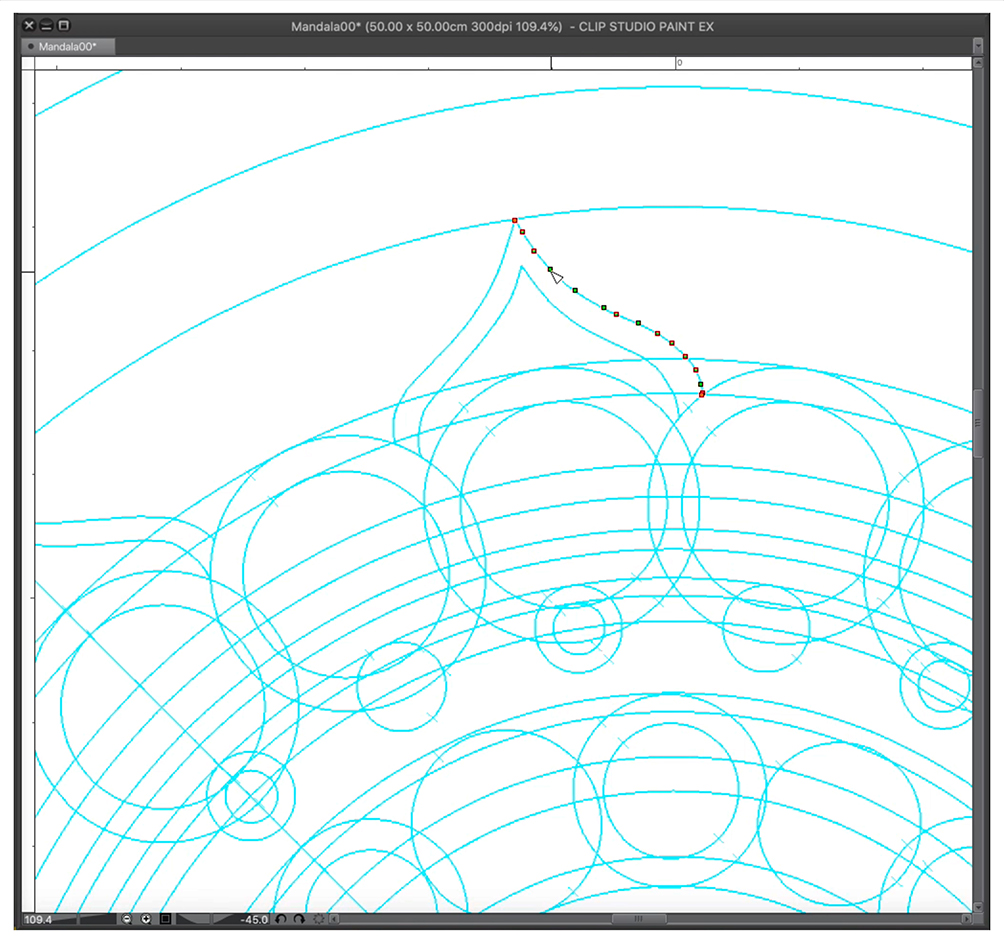
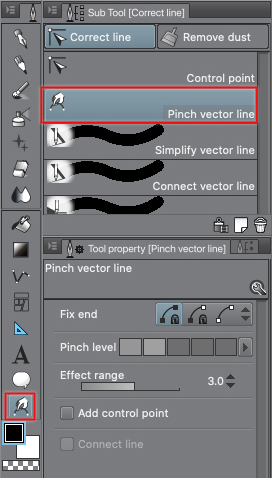
Y'all can adjust the lines of the rulers either by adding extra points or moving them with the tool to correct the line, until you are happy with the result.
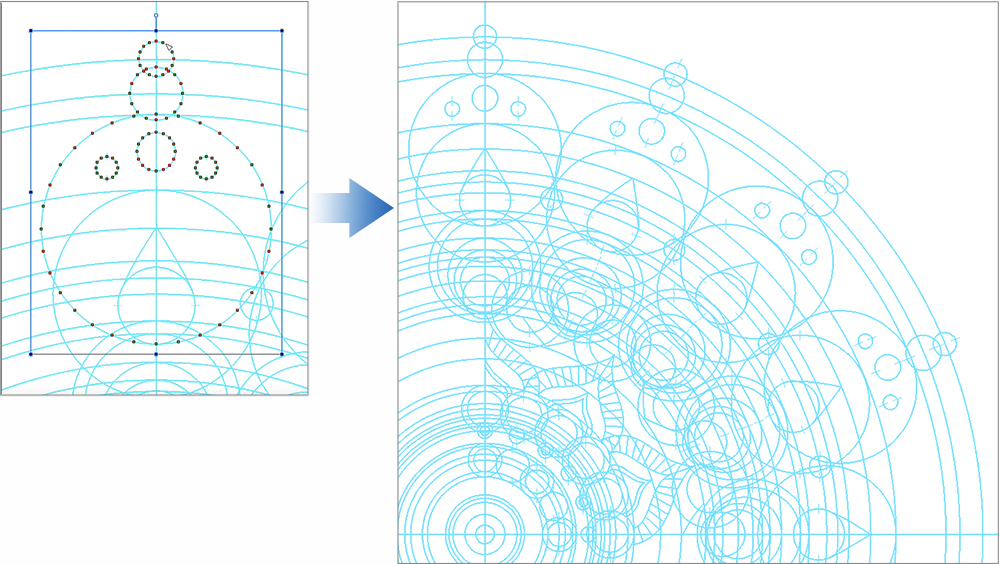
Once yous have the ground of the mandala, information technology is time to use Clip Studio Paint'due south Symmetrical ruler. To do this, keep selecting the same layer with the guides, and using the symmetrical ruler, click on the center of the image and drag to the correct or left.
Concur the Shift key to make certain the line is completely horizontal, or line information technology up with the grid.
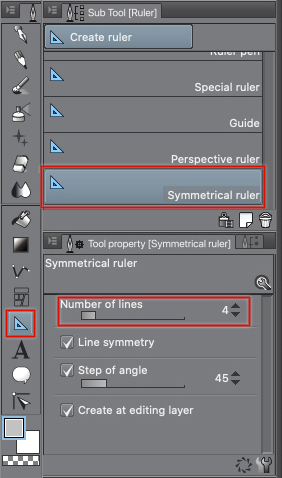
Make certain that, in the ruler'south Tool Property palette, the Number of lines is ready to 4. This will make whatever you lot in each quarter exist automatically reflected in the other 3 quarters.
Now you can beginning cartoon the mandala. Depict on the same layer with whatever pen or brush tool you similar, or that will suit the style yous want to accomplish.
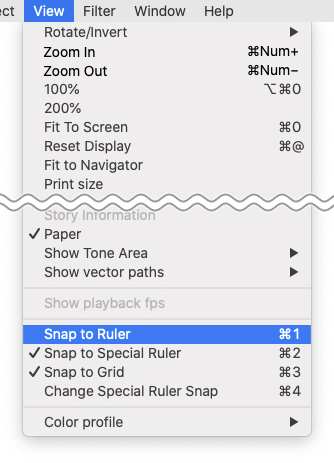
To brand the brush to follow the lines of the rulers you have created, open the View menu and turn on Snap to Ruler.
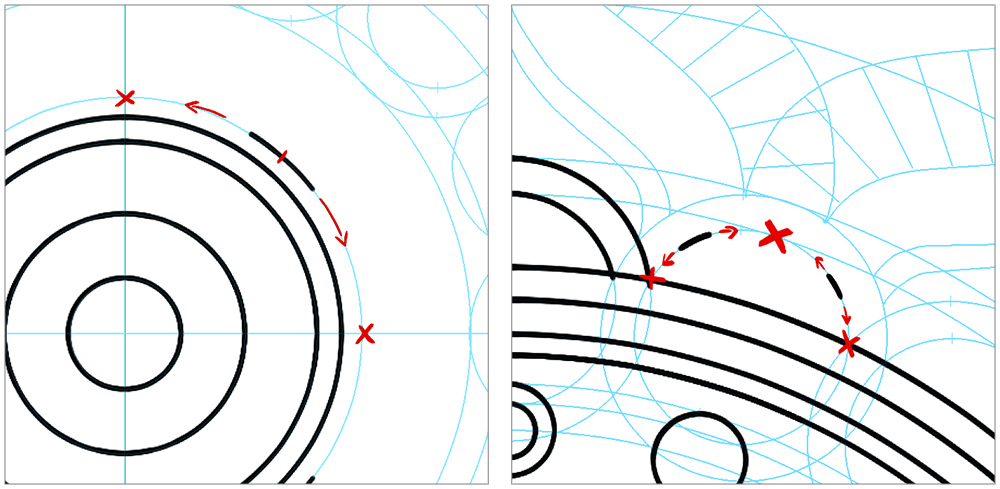
Now, if you draw on top of the ruler, the line will follow the ruler perfectly. Information technology is important not to starting time at intersections, since the brush may follow the ruler in a unlike direction to the 1 yous want. Instead to erase gaps, start at a distance from intersections and go dorsum forth the ruler.
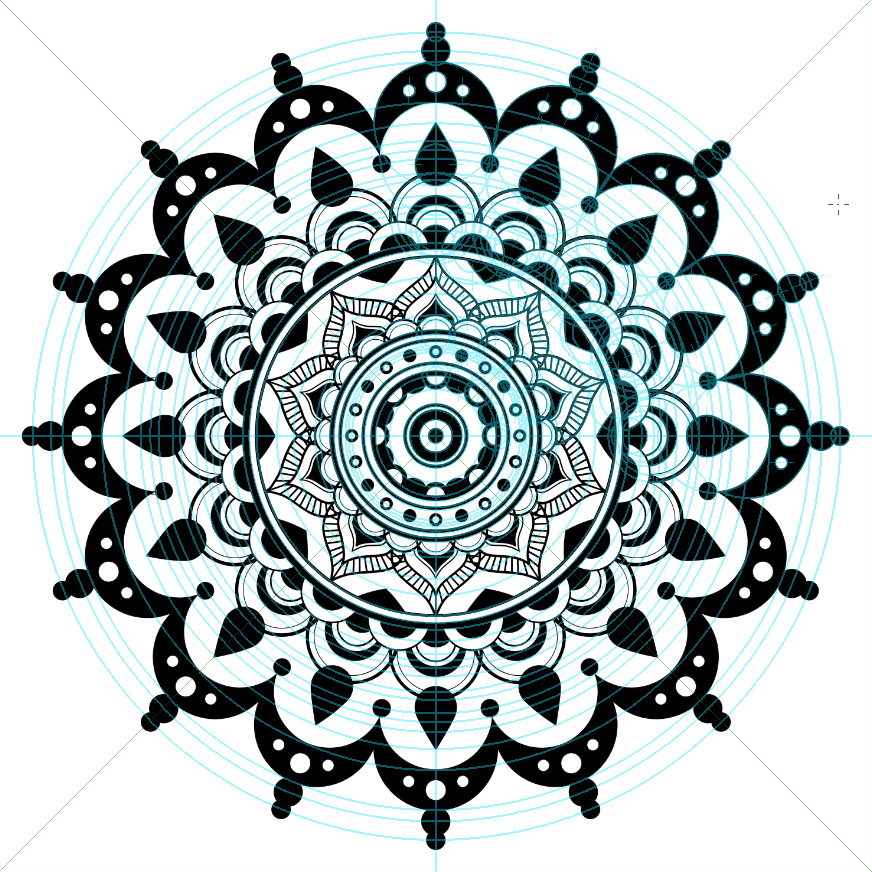
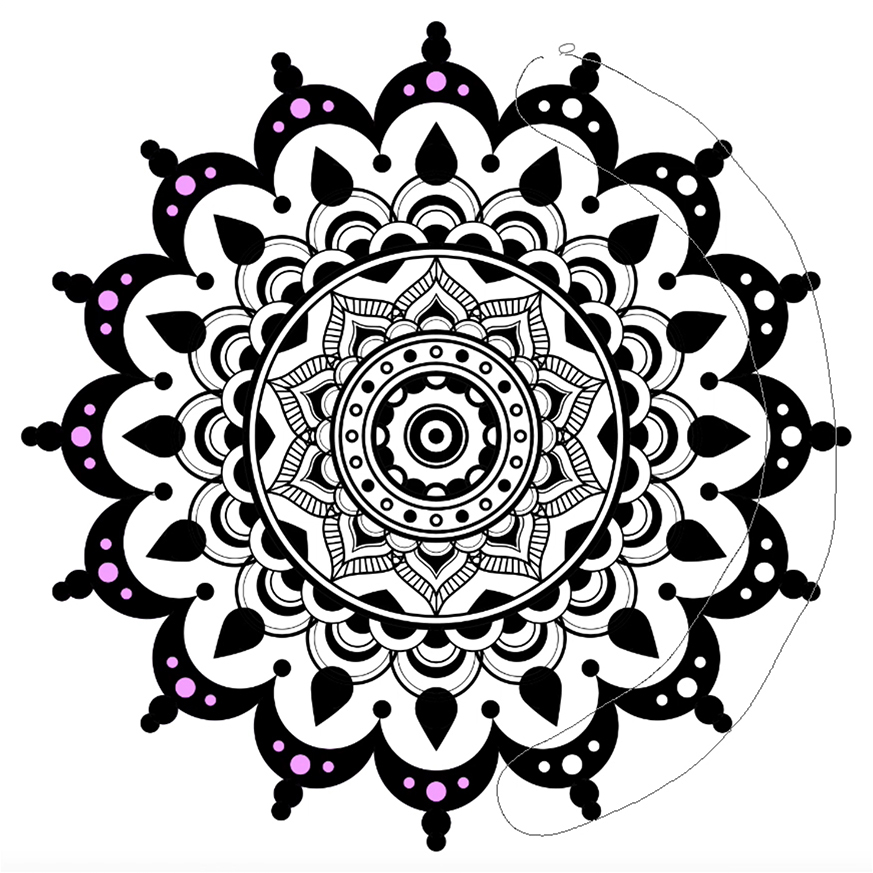
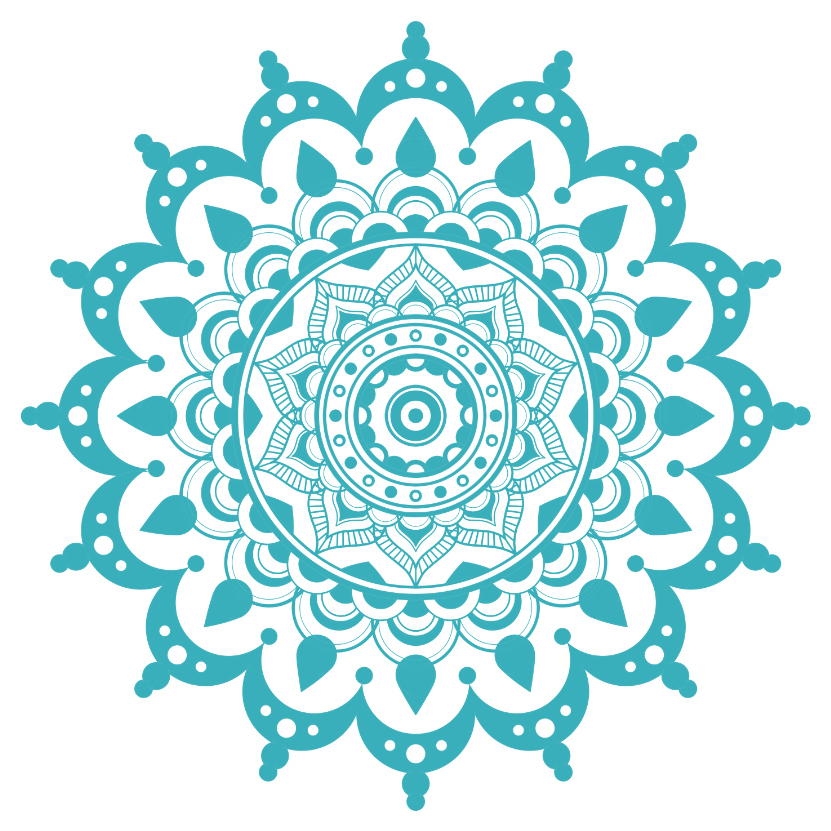
Once you have all the lines of the mandala, the result will be like the 1 on this picture. Now you can print it, turn information technology into a vector if you want to make information technology bigger, or colour it.
two. Coloring
The easiest way to color a mandala is using the paint bucket Fill up tool. Since all shapes of a mandala are closed, in that location is no trouble using this method.
You can color on the same layer as the line art, merely information technology is unremarkably better to create a new layer beneath.
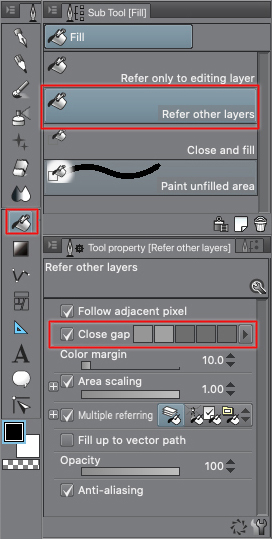
If y'all paint on the same layer as the line art, use the Fill tool > Refer only to editing layer sub tool. Still, if coloring on a new layer, use Fill up > Refer other layers. This will consider the lines of the other layers when filling the enclosed areas, and it will be easy to alter the colors or the lines later on. To make sure that the color doesn't spill out of the desired expanse even if not perfectly closed, check the Shut gap choice in the Tool Property palette.
To save time, you can use the symmetry ruler like before, and speed upward the coloring process. You lot can also use different filling methods, such as dragging the filling tool through adjacent areas.
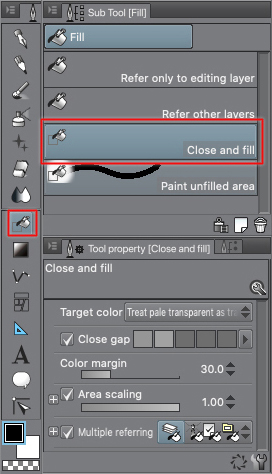
You can also use the Close and Fill tool. Information technology works similarly to the Lasso tool; freely select the area yous want to fill, and Clip Studio Paint volition automatically fill in the closed areas within the selection.
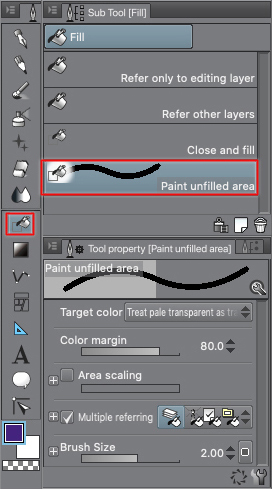
The sub tool Paint Unfilled Area can be used equally a brush which paints on the area y'all want to fill, without worrying about getting out of the margins. The software volition automatically make full in the element, leaving the outside clean.

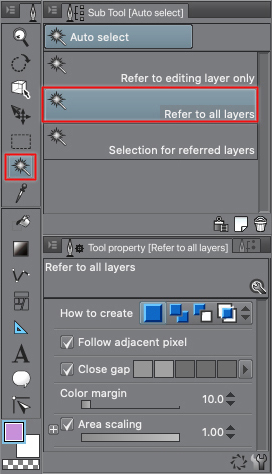
Some other way to paint is using the Auto select subtool to select those parts you lot want to paint with a specific colour. Select Refer to editing layer merely or Refer all layers, depending on whether y'all desire to paint on the line layer or on a lower one. Once you accept selected everything you want to color, and have your color selected, printing Alt + Delete.
Apart from the filling tool, y'all can also use the brush to easily paint without painting outside the borders.
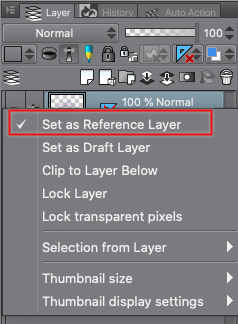
For this, firstly press Ctrl and click on the line layer, and so mark that layer as a reference layer in the pop out carte du jour.
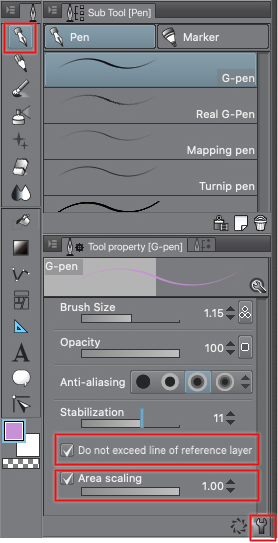
Then, choose the brush yous want to utilise. In this case, I'll utilize the Pen tool. In Tool Property palette, plow on Practice not exceed line of reference layer and Area Scaling. The beginning option is used to make the line art layer a reference layer, and the 2d selection is to ensure that there are no white borders between the fill and the lines.
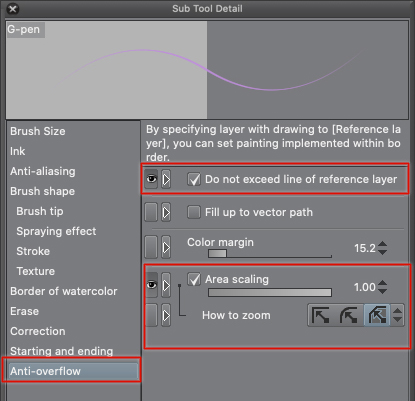
If y'all cannot come across these options, go to the Sub Tool Detail menu at the bottom correct and click to the left of the settings in the Anti-overflow section to make both options visible as shown beneath.
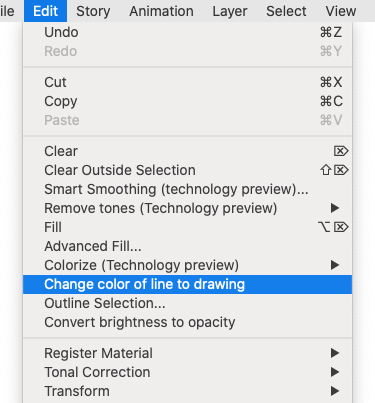
iii. Changing the Line Color
The color of the line is very easy to change if the line art and the color are on split layers. To practise this, select the line layer and the colour you lot want to use, then go to the Edit menu > Alter color of line to drawing command, and the line will automatically change to the selected colour.
If you lot have the color and the line in the same layer (instead of an prototype like the one below), you will run across a line and fill paste that will form a unmarried figure and all the details will be lost.
4. Coloring Tips
Equally for mandalas, if you want to use them to relax, the best thing to do is to print the lines, accept some colored pencils or markers, and spend some time coloring them in.
If, on the other hand, yous want to use them for other purposes, such as designs for printing, to create postcards or equally a part of an illustration, the best thing is to color them digitally.
I personally prefer to employ the Fill tool as much as I can, and start with blocked colors that I can then pigment over to create gradients, shadows, or other motifs.
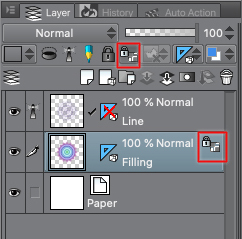
This is how yous do information technology: Once you take the solid colors, plow on Lock Transparent Pixels in the Layer palette. The padlock symbol by the layer indicates that information technology is locked. This option prevents you from painting or drawing in the areas of the layer that you take non previously painted.

With this technique information technology is very easy to modify each office of the color you lot want afterward yous have all the desired parts previously painted.
As for the all-time colors for a mandala, it is a personal selection, only like the techniques we cull. From rainbow mandalas to monochromatic ones achieved by simply changing the level of saturation, you tin can create anything.
Ideally, you should non add likewise many colors in a single mandala, since it could lose its relaxing purpose with clashing colors. Instead, you lot tin can create something harmonic using colors in a like range, whether cold or warm, or something more contrasted with complementary colors in the color circle.
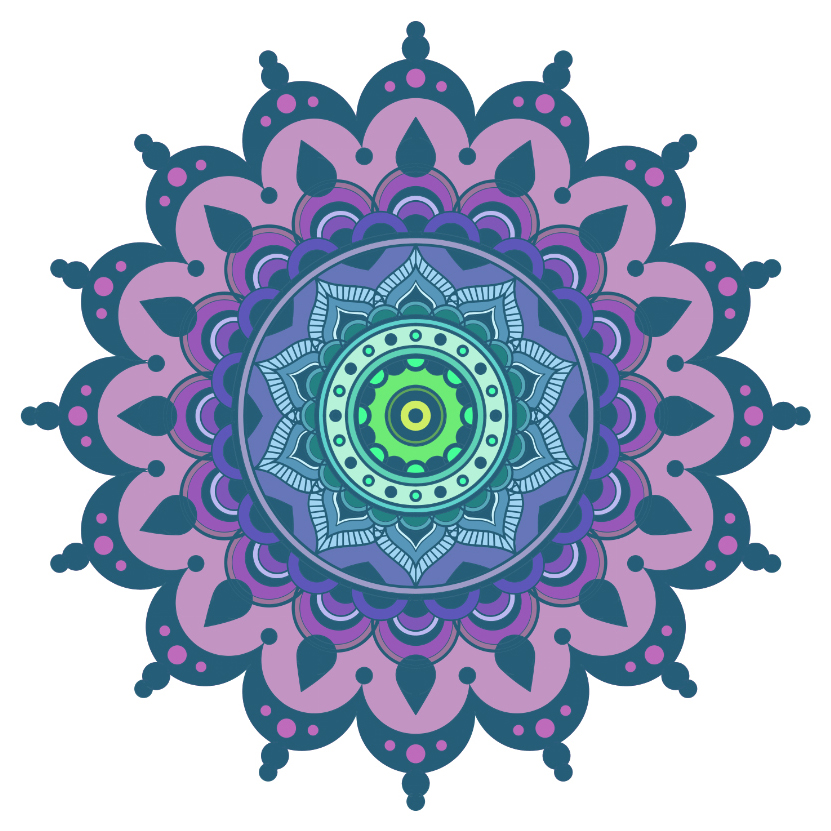
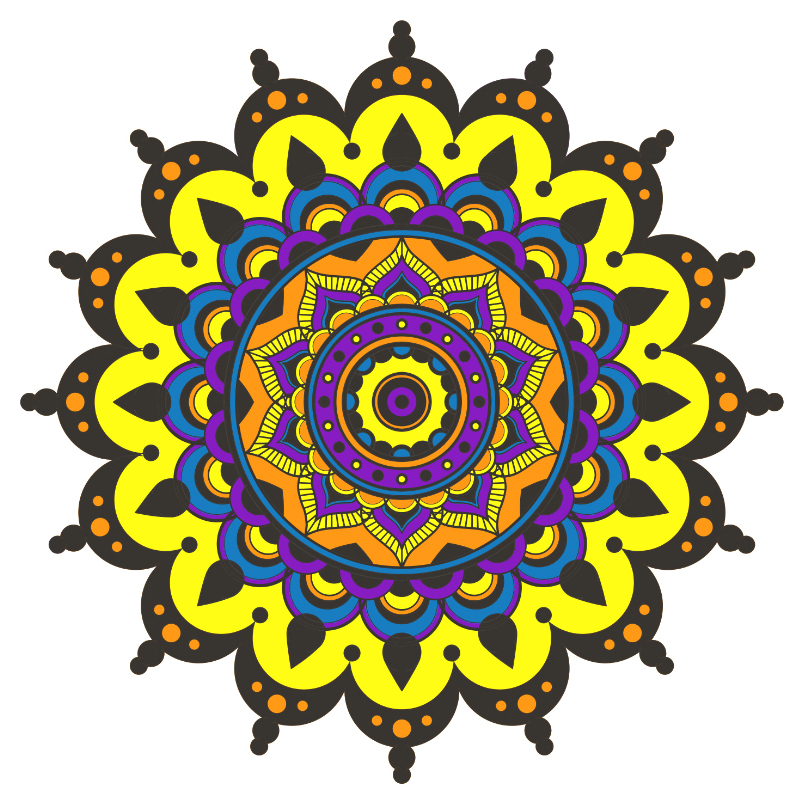
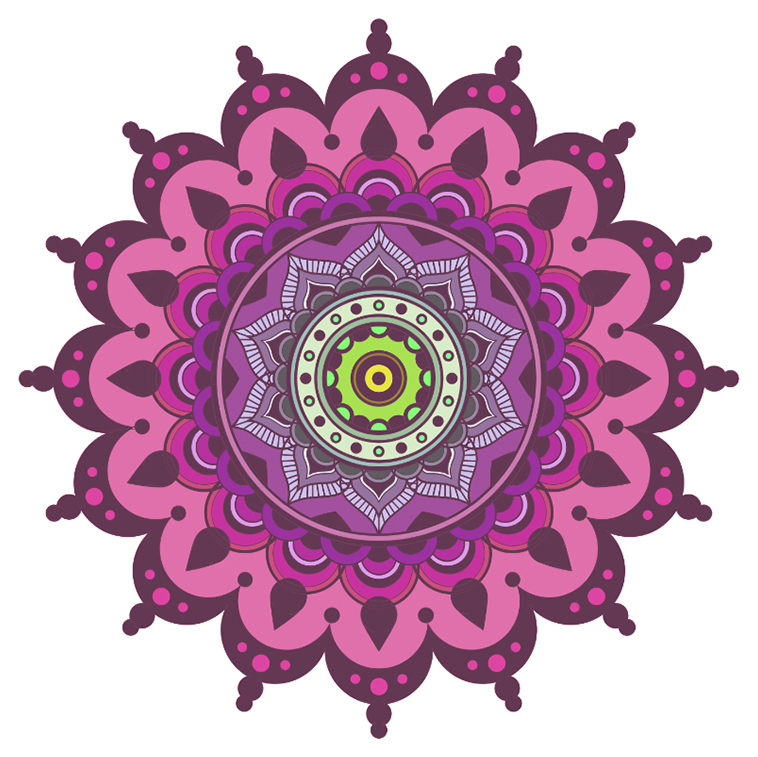
The following example depicts a cold colour gradation, not as well saturated, ranging from imperial to green. It is a adequately harmonic color range, just also with some richness in its variety.
In the following image, the colors are much more dramatic, yet still forming at triadic color scheme. In this case, there are four equidistant colors in the chromatic circle that maintain harmony precisely past maintaining that equivalent distance between them.
To get in easier, you tin utilise sites like paletton.com, which offer dissimilar options for color combinations.
5. Adjusting the Colors
If you desire to change the entire chromatic attribute of the mandala, there are three unproblematic ways. These methods can be used on i color or a choice of colors if you select them starting time, or tin be applied to the entire image.
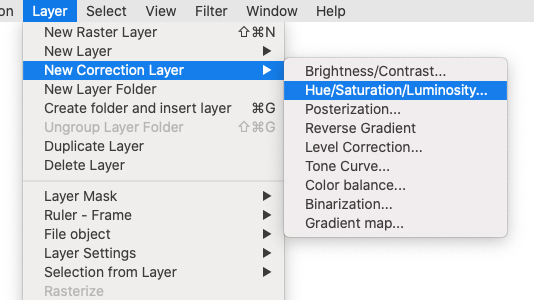
The commencement technique is to change the tone. Go to the Layer bill of fare > New Correction Layer > Hue/Saturation/Luminosity, making sure that the layer whose color you want to modify is selected.
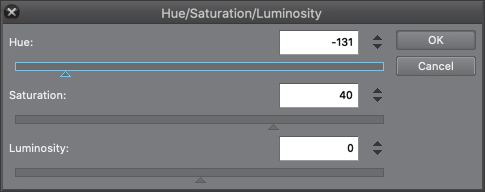
A window volition open and at that place you tin modify the Hue, the Saturation and the Luminosity.
Hue changes the dash of the color. Moving the arrow changes the tone of the image.
Saturation indicates the intensity of the colour. And the Luminosity refers to how dark or bright a color is.
With these three variables, you can modify the colors and give them a totally unlike advent, or maybe just change small nuances until you are happy with the result.
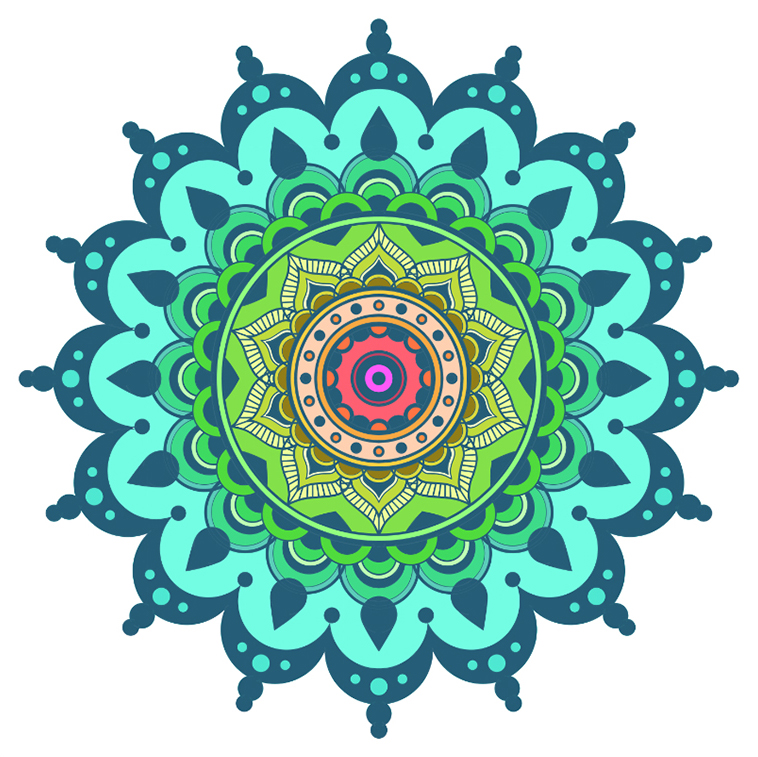
So, past sliding the hues towards warmer ones and increasing the saturation, the following image can be obtained.
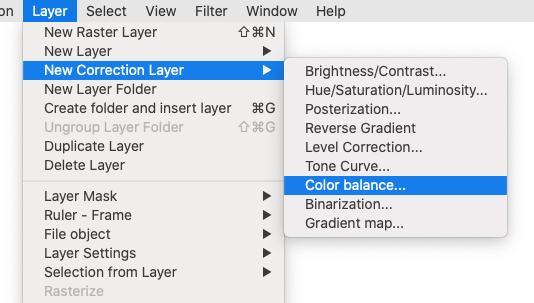
Some other way is adjusting the color balance with the Layer card > New Correction Layer > Color Balance.
In the dialog box that appears, y'all can modify the tones of the illustration in particular. For example, you can change the shadows, the mid-tones or the highlights for each color. It's all nearly trying and experimenting.
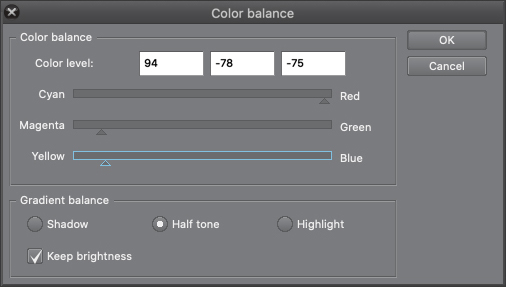
In the following case, I have modified blue and cyan, the first ones approaching yellow and the latter, ruby. The greens take likewise been modified, pushed toward magenta. With this, the image at present has a warmer color palette.
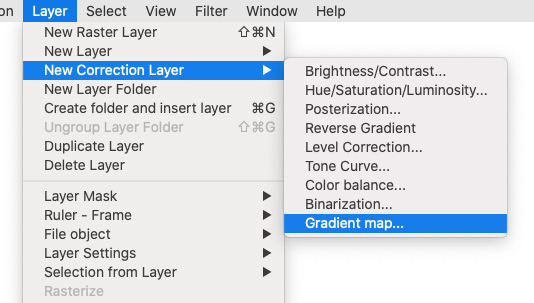
The final method is the gradient map. Again, start from the Layer card > New Correction Layer, and then select Gradient map.
A dialog box will appear. There, you tin can choose whatsoever of the gradient maps from the box on the left. In the Slope fix drop-down bill of fare, there are several groups of preset gradient maps. By double clicking on one of them, you see a preview of the changes in the prototype.
You lot can motion the nodes in the upper part to vary the slope, and in the lower correct yous can go colour past color playing with the curves to edit the color mix.

In the following example, I have used 1 of the preset maps, resulting in a completely changed final image. In this case, if I want the groundwork to remain white, I must select the colored role before applying the gradient map.

Mandalas are very simple elements, simply at the same time they are complicated. They are shapes that you tin play with and enjoy coloring and creating them, so it is all-time to try and experiment with different shapes and colors. Try these methods or try to discover others that may work for you lot from here.
Source: https://www.clipstudio.net/how-to-draw/archives/159150
0 Response to "Clip Studio Paint How to Draw Circle"
แสดงความคิดเห็น